I made elastic waist pants, Vogue 8962. Wait, did I just utter the garment description that screams “given up?” Indeed, this may be the first time in my life that I’m happy with the idea of using elastic in a waistband. Foremost, it’s way faster to make than a real waistband and secondly, I’m a bit unhappy with my midsection right now, and I’m finding my pajama pants the most comfortable bottom pieces that I own. Clearly, the solution is to make something comfortable like my pajamas but that can also go grocery shopping. I never tuck in my tops as it is so I figured, why not. Worst thing that happens is I discover that it doesn’t work for me and I try something else.

Yay, comfy pants!
Pants fitting is definitely not something I’m good at, but after enough attempts (mostly unwearable) I have found my standard alterations. Depending on the pattern I sometimes have to shorten the front rise, but my measuring tape swore that this pattern will not need it. Tissue fitting revealed it to reach my belly button, which is an inch shy of my actual waistline. The back, well, not so much. I usually add a wedge along the back seam of about 1.5 inches and the same was necessary this time. I have in the past added extra to the back thigh depth, but I decided to try something different this time. Per Nancy Zieman’s book, Pattern Fitting with Confidence, I used the size 12 for the crotch depth instead of the size that matched my measurements. Then I extended the pattern piece out to the size 16 that I cut otherwise. Lastly, I shortened the leg by half an inch above the knee. Considering that I’m only 5’2″, I love that my inseam is 31″, so usually I don’t have to do much to length beyond a slightly more generous hem, but I decided I wanted to make the knee of the pattern match mine (for pretty much the first time ever).
Just the right length
Construction for this was pretty straight forward- inseams, crotch, outer leg seam. I decided to construct this by sewing machine after looking at an old pair of pants from TJ Maxx made from similar fabric. Then I pressed open each seam and serged the seam allowances. I probably didn’t need to do that with this fabric, but I like having decently finished interiors to my clothes. I then serged the hem and waist and measured out the (supposedly) no-roll waist elastic. A couple of months ago, Kathleen Fasanella had a post about elastic casings and I gave her method a whirl. It was so much easier than threading elastic through a hole and having to stitch it closed after the fact and cussing at the bodkin/elastic for getting hung up on whatever it is that makes threading elastic such a pain to do. I was thrilled with how easy it was to sew up the elastic into the casing and the great looking result.

So stinking easy, why did I not think of this before?
One thing I have found from sewing for my children is there needs to be something to easily identify the back of garments. For myself and pajama pants in the past I would do some sort of crazy stitch over the back seam usually as part of closing up the waistband. However, when you train kids to look for the tag in the back to make sure their clothes make it on the right way, you have to put something just as obvious. Ask me why I know this. Anyway, I like to use a strip of white bias binding folded over as it’s unobtrusive and means I’m not wondering which way is the right way.
I ignored the pattern directions, but based on the technical drawing showing a stitched hem, I had to look to see what the pattern called for. Seriously, why indicate two lines of straight stitching that knowing my luck would not stay equidistant all the way around the hem. Ugh, I hate when directions are stupid like that. This is a pattern for knits, so be willing to say twin needle or other finish suitable for knits (man, I wish I had a coverstitch machine when I say things like that). I decided I wanted to dress this up as much as any pants being held up by elastic can be and used the stretch blind hem on my sewing machine and am quite pleased with the result.

In the end, I think I should have taken another half inch out of the front rise, so my measuring tape did lie, but that’s me being nitpicky. Overall, I’m happy with the look even with all of my lumps and bumps being telegraphed by the relatively thin fabric. I think I just like a more substantial bottom weight fabric, but I’m not kicking these out of the wardrobe (in fact wearing them grocery shopping today, win!)
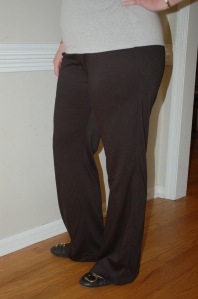
Obviously, I will never wear these with a top tucked in, but it’s fun seeing how they fit without my top obscuring the top of the pants.

Not too bad really

Yikes, looks like I need more room in the back thigh

I’m glad the tutorial was helpful. Your pants look great too!
I’m ready to start gushing like a fan girl. Thank you so much for your awesome website! You’ve been such an inspiration to me ever since I got serious about sewing back in 2006.
Well I guess we’ll just have to have a mutual love fest. I’m thrilled when people use my tutorials.